Turning the terminal into a canvas
Many of the original roguelikes used the terminal to render their game world with text characters. Nowadays this is not very common anymore, with many roguelikes opting to use actual graphics libraries over ASCII characters. However, the limits of the terminal have definitely not been reached. In this article I will show how terminal escape sequences and half-block characters can be combined to render sprites and tiles in the terminal. I'll start with the basics, explain each part in detail, and slowly build up to the end result: a rendering method that can show fluent 16-bit graphics in a terminal.
Basic plain-text rendering
The most basic method of terminal rendering would be to simply print out text, divided into rows by newlines. You then redraw the screen by clearing it (using clear) and printing the whole thing again. Depending on the efficiency of your code and the speed of your terminal this might result in some screen flickering.
Here's an example code snippet in python that contains a function using this rendering method:
"""
Renders a 2d array containing ascii characters to the terminal

@param  view_array:     a list of strings representing the players view of the map
"""
def render(view_array):
    os.system('clear')
    print('\n'.join(canvas))
Using escape sequences
The previous method works, but it does not allow for any optimizations. It is impossible to only redraw certain portions of the screen, even a single changed character requires redrawing the screen in its entirety. Also, the only thing we can actually render to the screen this way is white on black unicode characters. That works for really basic roguelikes, but if we want something more colorful we will need to use ANSI escape sequences.
These sequences are interpreted by the terminal and cause it to perform some built-in functions. Some of this functionality enables us to set the cursor position, change the foreground (or background) color and erase the screen.
For purposes of turning the terminal into a canvas we'll need the following escape sequences:
- To set the position of the cursor: Esc[${Line};${Column}H
- To clear the screen: Esc[2J
- To set the foreground color: Esc[38;2;${R};${G};${B}m
- To set the background color: Esc[48;2;${R};${G};${B}m
Here's an example typescript/node function that can render colored characters in the terminal using escape sequences:
interface Color {
    r: number;
    g: number;
    b: number;
}

class Cell {
    char: string;
    fore: Color;
    back: Color;

    constructor(
        char: string = " ",
        fore: Color = new Color(255, 255, 255),
        back: Color = new Color(0, 0, 0)
    ) {
        this.char = char;
        this.fore = fore;
        this.back = back;
    }
}

const TERMINAL_ROWS = 24;
const TERMINAL_COLUMNS = 80;

let stdoutBuffer = "";

/**
 * Directly draws a cell on the screen
 */
function drawCell(x: number, y: number, cell: Cell) {
    // Set the appropriate foreground color
    let color = cell.fore;
    const foregroundColor = `${ESC}[38;2;${color.r};${color.g};${color.b}m`;

    // Set the appropriate background color
    color = cell.back;
    const backgroundColor = `${ESC}[48;2;${color.r};${color.g};${color.b}m`;

    // Set a character at position (x,y) in the terminal
    const character = `${ESC}[${y+1};${x+1}H${cell.char}`

    // Reset to default (e.g. foreground and background color)
    const reset = `${ESC}[0m`;

    // Append the sequences to the output buffer
    stdoutBuffer += foregroundColor + backgroundColor + character + reset;
}

/**
 * Renders a 2D array to the screen
 */
function render(viewArray: Cell[][]) {
    // Loop over the 2D array and generate the escape sequences necessary to
    // draw the cell to the terminal screen at the appropriate location
    for (let y=0; y < TERMINAL_ROWS; y++) {
        for (let x=0; x < TERMINAL_COLUMNS; x++) {
            drawCell(x, y, viewArray[y][x].char)
        }
    }

    // The escape sequences are stored in an output buffer. We send them to
    // the terminal all at once, when we are done rendering.
    process.stdout.write(stdoutBuffer);
    stdoutBuffer = "";
}
Efficient screen updates with buffers
Now we can draw colored characters to the screen, but we still haven't made use of the other huge improvement that the escape sequences make possible: efficient updating of the terminal screen. With the escape sequence to set the position of the cursor we can choose to only redraw certain regions of the screen, where needed.
To implement this we'll need to store the current screen state, i.e. what's currently being shown on the screen (or terminal in this specific case), in a separate buffer. All drawing operations are not rendered immediately, but are kept in a queue. A drawing operation contains the coordinates of the terminal cell that's going to change, the foreground color, the background color and the text character. Once all the drawing operations for a new frame are done, we go over all the drawing operations. For each drawing operation we check if it will result in a change on the screen. For example, if there is a drawing operation to set the background color of a cell to red, we will then look into the screen buffer to see if that cell doesn't already have a red background. Only if we notice a difference do we actually perform a drawing operation, no difference results a no-op. Also, if there is a difference, we'll need to update the screen buffer so that it accurately represents the current screen.
A small note here: we could also just keep two buffers (2d arrays), one to store the screen state and one to store the a temporary buffer to be used as a "staging area". When drawing a new frame we would just loop over the 2d buffers and compare each item, performing a draw-op if there is a difference. This approach is less efficient however, since in this case we have a time complexity of Θ(n), n being equal to the width of the buffer times the height. When using a queue to store the draw ops we have a best case scenario of Ω(0), and a worst case scenario of O(n).
Here's an example screen rendering function that uses the draw queue + screen buffer approach as discussed earlier:
interface DrawOp {
    x: number;
    y: number;
    cell: Cell;
}

let drawQueue: DrawOp[] = [];
let currentScreen: Cell[][];

function render(drawOps: DrawOp[]) {
    const plannedOps = drawOps.length;

    while (drawOps.length > 0) {
        // Get draw-op and corresponding terminal cell from screen buffer
        const drawOp = drawOps.shift();
        const currentCell = currentScreen[drawOp.y][drawOp.x];

        // Compare draw-op to current screen, generate escape sequence on difference
        if (
            drawOp != null && (
            drawOp.cell.char !== currentCell.char ||
            !Color.equals(drawOp.cell.fore, currentCell.fore) ||
            !Color.equals(drawOp.cell.back, currentCell.back)
        )) {
            drawCell(drawOp.x, drawOp.y, drawOp.cell);
            currentScreen[drawOp.y][drawOp.x] = drawOp.cell;
        }
    }

    // Flush escape sequences to the terminal, all at once
    process.stdout.write(stdoutBuffer);
    stdoutBuffer = "";
}
Turning the terminal into a canvas
There are two block elements, the half block characters ("▀" and "▄"), that allow us to use the terminal as an actual canvas, with pixels that can be set individually. If we were to look at the terminal, and looked at each cell as a pixel, then we would have a canvas with a very small resolution (80x24). That alone is not enough to actually render anything useful. Such a canvas could contain about one and a half 16 bit tile sprites vertically, or three 8bit sprites. Again, not enough to actually do anything useful with. However, with the half block characters, we can actually double the vertical resolution. Those characters allow us to divide a cell into two vertically, by making smart use of foreground and background colors. Now with a default sized terminal of 80 by 24 cells, we can create a canvas with a resolution of 80 by 48. In terms of 16-bit tiles, that's a canvas of 5 by 3 tiles, which - while still very small - is actually useful.
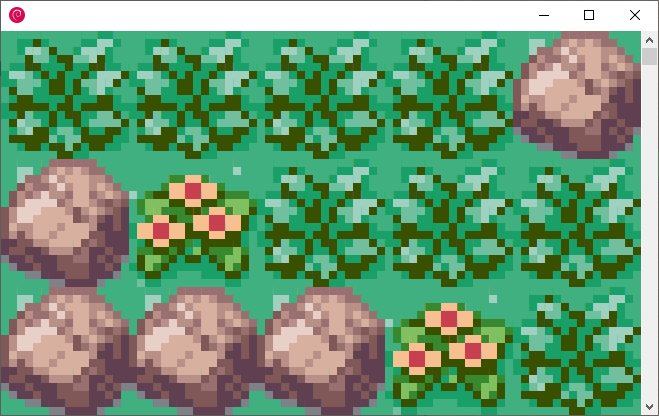
Below you can see what such a 3 by 5 tile canvas looks like in a terminal (the tiles were taken from pokemon Leaf Green):
To implement this we basically just build an abstraction on top of the terminal, one where we convert pixel-based drawing operations on a 80 by 48 canvas to cell-based drawing operations on an 80 by 24 terminal (or, to generalize, convert pixel-based drawing operations on a canvas to cell-based drawing operations on a terminal with half the height). The conversion basically consists of turning two vertical pixels into one terminal cell. In the terminal cell we use the upper block character ("▀"). Then for the first (or upper) pixel we set the foreground color of the cell to the pixels's color. For the second (or lower) pixel we set the background color of the cell to the pixel's color.
Here's an example of such an abstraction:
const CANVAS_HEIGHT = 48;
const CANVAS_WIDTH = 80;

// A class using the efficient drawing technique discussed previously
let terminal = new Terminal();

let pixels: Color[][];

/**
 * Clears the canvas buffer
 */
function clear() {
    pixels = [...Array(CANVAS_HEIGHT)].map((x) =>
        Array(CANVAS_WIDTH).fill(null)
    );
}

function render(canvasPixels: Color[][]) {

    // Loop over the canvas pixel buffer in steps of two vertically
    for (let y = 0; y < CANVAS_HEIGHT; y+=2) {
        for (let x = 0; x < CANVAS_WIDTH; x++) {

            // Grab two pixels, use the first one as foreground color
            // and the second one as background color for the terminal cell
            let foreground: Color = canvasPixels[y][x];
            let background: Color = canvasPixels[y+1][x];

            terminal.setCharacter(
                x,
                Math.floor(y / 2),
                "▀",
                foreground,
                background
            );
        }
    }

    clear();
    terminal.refresh();
}